We've had our pedestal-mount MHP WNK gas grill for about a dozen years. It's served us well, but this summer, I noticed a hot spot forming under the front center portion of the grill. No doubt a gas leak from the burner. I haven't been as faithful as I should have been about cleaning the grille, so I figured it was finally time to take the grill apart, diagnose the hot spot problem, and thoroughly clean everything.
First, I removed the porcelain-coated grill grates and set them aside.
Next, I pulled out the round briquettes, brushed off all the burnt food dust, and set them aside. Several of them had deteriorated & broke into pieces when I moved them, so I'm now short four briquettes. I'll leave the gaps at the back corners where they won't be missed as much.
I pulled out the steel grate on which the briquettes sat. It had gotten rather rusty over the years, especially at the welded joints. I scraped off the big chunks of rust and what little food debris there was with a screwdriver.
Removing the burner was simple. On this model, only two cotter pins hold the single, large, H-shaped burner into the grill's cast aluminum bottom half. After pulling those, I carefully slid the burner and venturi tubes out of their access hole in the bottom of the grill.
 | |
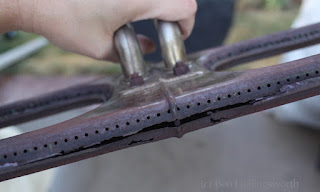
| Old burner. I think I see the problem. |
When I looked at the old burner, the problem was obvious. The seam where the two halves of the burner joined had rusted through for several inches, allowing a lot more gas to escape.
My first attempt at fixing it was to merely spin the burner 180 degrees to put the hot spot in back where it wouldn't affect me quite as much when grilling. The venturi tubes in the exact center of the burner with a symmetric bolt pattern, so rotating the burner was an option for me. This won't be the case for all grills.
 |
| New burner installed. Nice, even pattern. |
I had to break down and buy a new burner. New, dedicated burner could be bought only for about $50. My neighborhood Ace Hardware had a house brand generic replacement for $40, so I went with that. It's a GrillMark brand (pn 81304) that replaces H burners from 18-22" long. The new venturi tubes are made of flex tubing to conform to any shape, and can be stretched from 5.5-11" long. It took about 30-60 minutes to install, mounting in place with bolts & brackets rather than the cotter pins used by the original burner. Surely not quite as simple as a drop-in replacement, but I saved $10 and didn't have to wait a week for delivery.
With the new burner in place, I fired up the grill, and was happy to see a perfectly uniform H-shaped flame pattern. Time for reassembly!
 |
| After all the cleaning |
As they currently stand, they're a whole lot cleaner than they were a couple days ago, but they're still a long way from "like-new." Now that the bulk of the thick crud (basically charcoal) is gone, I'm going to try another dose of oven cleaner... once I buy another can. If that doesn't do it, then I'll just live with them the way they are.
I spent way more time on this than I expected to when I first tore into the hot spot problem. The result is that I've got a shiny, clean grill that I can't wait to try out.

No comments:
Post a Comment
Please leave your comment below. Comments are moderated, so don't be alarmed if your note doesn't appear immediately. Also, please don't use my blog to advertise your own web site unless it's related to the discussion at hand.